nyban1
You are here: Home » Systems » Sensing System » VM Piezoelectric Accelerometer » Vibro-Meter CA202 144-202-000-225 Piezoelectric Accelerometer
Leave Us A Message

loading

Vibro-Meter CA202 144-202-000-225 Piezoelectric Accelerometer

  • VM

  • CA202 144-202-000-225

  • $6800

  • In Stock

  • T/T

  • Xiamen

Availability:
Quantity:
facebook sharing button
twitter sharing button
line sharing button
wechat sharing button
linkedin sharing button
pinterest sharing button
whatsapp sharing button
kakao sharing button
snapchat sharing button
telegram sharing button
sharethis sharing button

The CA202 144-202-000-225 is an industrial-grade piezoelectric accelerometer designed and manufactured by Vibro-Meter (now part of the Meggitt Group). This model belongs to the standard version, equipped with an 11-meter integral low-noise cable, and is suitable for high-precision, high-reliability vibration monitoring and measurement in non-hazardous areas (i.e., non-potentially explosive atmospheres).


As the core "front-end" sensor for vibration monitoring systems, the CA202 employs classic shear-mode piezoelectric sensing principles and a robust all-stainless-steel sealed construction, specifically designed to withstand extremely harsh industrial environments. Its core advantages lie in its wide operating temperature range, exceptional resistance to environmental interference, high sensitivity, and long-term stable performance. Whether it's a high-temperature steam turbine in a power plant, a large compressor in a petrochemical facility, or critical rotating equipment in heavy manufacturing, the CA202 delivers accurate and reliable vibration data, making it the ideal choice for implementing predictive maintenance, ensuring equipment safety, and preventing unplanned downtime.


Its symmetrical shear-mode sensing element design, internal case insulation, and differential output characteristics ensure excellent immunity to electromagnetic interference and ground loop noise. The 11-meter integral cable provides users with greater flexibility and convenience when installing and routing cables on large equipment, eliminating the need for field-terminated connectors and ensuring signal transmission integrity and reliability.


2. Core Design Features and Advantages

  1. Exceptional Wide-Temperature Performance: The sensor body can operate continuously and stably within an extreme temperature range of -55°C to +260°C, with a short-term survival temperature as high as -70°C to +280°C. This allows it to be installed directly on high-temperature bearing housings or low-temperature process equipment without requiring additional cooling or heating accessories.

  2. Fully Welded Sealed Construction:

    • Sensor Housing: Made of austenitic stainless steel (1.4441) with hermetic welding, completely eliminating the risk of moisture or corrosion reaching the internal sensitive elements.

    • Cable Assembly: The low-noise measurement cable is encased in a heat-resistant stainless steel flexible protection hose (BOA type), which is also welded and sealed to the sensor housing and cable exit, forming a leak-proof, integral unit. This structure can withstand most industrial contaminants such as 100% relative humidity, water, steam, oil, salt spray, and dust, offering a very high degree of protection.

  3. High Accuracy and Sensitivity: Provides a standard sensitivity of 100 pC/g (±5% tolerance), capable of accurately capturing vibrations from weak to severe. The differential charge output mode effectively suppresses common-mode noise.

  4. Internal Case Insulation: Electrical insulation is achieved between the sensing element and the metal housing, with an insulation resistance exceeding 10⁹ Ω. This design effectively isolates measurement signals from fluctuations in equipment ground potential, prevents ground loops from forming, and is particularly suitable for multi-point monitoring systems in complex electrical environments.

  5. Robust Mechanical Design: The overall structure is compact, robust, and weighs approximately 250 grams. It can withstand shock up to 1000g (peak, 1ms half-sine wave), enabling it to endure accidental impacts during installation and operation.

  6. Excellent Low-Frequency Characteristics: The frequency response extends down to 0.5 Hz. When paired with a suitable charge amplifier, it can measure low-frequency vibrations of slow-speed rotating machinery or structures, broadening its application scope.

  7. Easy Installation: Provides a standardized four-hole mounting pattern (M6 threaded holes). Electrical insulation of the mounting surface is not required, simplifying the installation process. It is dynamically calibrated at the factory and, under normal conditions, is maintenance-free and requires no recalibration throughout its service life, significantly reducing total cost of ownership.

  8. Flexible Configuration: Available in multiple cable length options (3m, 6m, 11m, 20m, models 144-202-000-2x5/2x6). Additionally, ATEX, IECEx certified explosion-proof versions are available (models 144-202-000-1x5/1x6) to meet the needs of different application scenarios.


3. Typical Application Areas

Due to its exceptional reliability and environmental adaptability, the CA202 piezoelectric accelerometer is widely used for condition monitoring of critical equipment in the following industrial sectors:

  1. Power & Energy Industry:

    • Gas & Steam Turbines: Monitor bearing vibration, blade pass frequency to prevent surge and mechanical failures.

    • Large Generators & Motors: Detect rotor imbalance, misalignment, bearing wear, and vibration induced by electrical faults.

    • Hydraulic Turbines & Pumping Stations: Monitor cavitation, hydraulic imbalance, and mechanical looseness.

  2. Oil & Gas Industry:

    • Centrifugal & Reciprocating Compressors: Monitor piston, valve, crosshead, and bearing condition; predict valve damage and connecting rod failures.

    • Pipeline Pumps & Fans: Monitor bearing health and impeller balance.

    • Offshore Platform Critical Equipment: Its sealed and corrosion-resistant properties are well-suited for marine climates.

  3. Heavy Manufacturing & Process Industry:

    • Large Gearboxes & Drive Trains: Diagnose gear tooth wear, pitting, and breakage.

    • Rolling Mills, Paper Machines, Printing Presses: Monitor roll bearing condition and structural resonance.

    • Mining Machinery (Crushers, Ball Mills): Monitor bearing and gear condition under heavy loads and high dust environments.

  4. General Industry & Infrastructure:

    • Large Industrial Fans & Cooling Towers: Detect imbalance, bearing damage, and blade fouling.

    • Critical Pumps: Predictive maintenance for all types of centrifugal and plunger pumps.

    • Structural Health Monitoring: Modal analysis and vibration monitoring of bridges, high-rise buildings, and towers (note low-frequency response).


4. System Integration, Installation, and Cabling Guide

1. Complete Measurement Chain Composition

The CA202 as a sensor requires subsequent equipment to form a complete chain for signal processing and transmission:
【Measurement Point】 → CA202 Sensor → 11m Integral Cable → IPC 70x Series Charge Amplifier/Transmitter → K 2XX Series Transmission Cable → GSI XXX Series Galvanic Separation Unit → Monitoring System (e.g., VM600, MMS, PLC/DCS)

2. Key Installation Steps & Best Practices

A. Mounting Location Selection:

  • Golden Rule: Close to the bearings! Prioritize the most rigid location on or adjacent to the bearing housing.

  • Orientation: Ensure the sensor's sensitive axis (usually marked on the housing) aligns with the desired vibration measurement direction. Typically, radial (horizontal/vertical) and axial vibrations are measured.

  • Surface Requirements: The mounting surface should be flat, clean, and smooth (recommended Ra < 1.6 μm). An uneven surface introduces base strain error, affecting low-frequency measurement accuracy.

B. Mechanical Installation (Using CA202 as example):

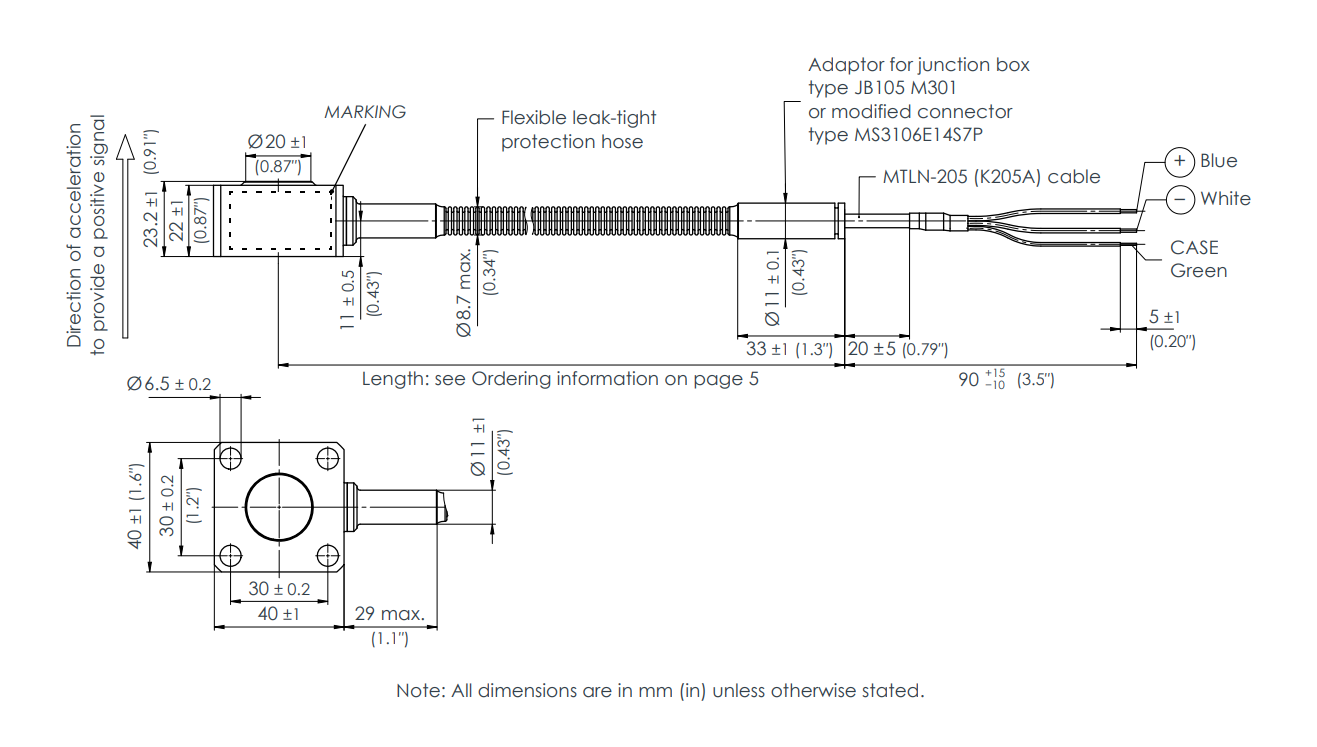
  1. Surface Preparation: Machine a flat area (flatness better than 0.01mm) at the designated location and drill and tap 4 x M6 threaded holes (depth 14mm).

  2. Cleaning: Thoroughly clean the sensor base and mounting surface with a lint-free cloth and solvent.

  3. Threadlocker Application: Apply a medium-strength threadlocking compound (e.g., LOCTITE 241) to the screws to prevent loosening from vibration.

  4. Mounting: Place spring washers, align the sensor with the holes, and hand-tighten the screws.

  5. Tightening: Using a torque wrench, tighten all four screws evenly in a cross-pattern sequence to 15 N·m. DO NOT OVERTIGHTEN! Excessive torque can distort the base, severely impacting performance.

C. Cable Routing and Fixing:

  1. Bend Radius: The minimum static bend radius for the cable (including sleeve) must not be less than 50 mm. Avoid any sharp bends, which can damage internal conductors and shielding.

  2. Stress Relief: Form a gentle "service loop" at the sensor cable exit to absorb tensile forces and thermal expansion/contraction stresses during equipment operation.

  3. Fixation Spacing: Use stainless steel cable clips (suitable for Φ8mm tubing) to securely fix the cable along its route every 1-2 meters. Avoid leaving cables suspended or loose, as movement can generate triboelectric noise.

  4. Isolation: Keep signal cables as far away as possible from high-interference sources such as high-power supply lines and VFD output cables; maintain a minimum parallel separation of 30cm. If crossing is unavoidable, do so at a 90-degree angle.

D. Electrical Connection:

  1. Connection to Charge Amplifier (IPC XXX):

    • Connect the two signal wires from the CA202 cable end (typically white and red) to the IPC input terminals labeled "SIG+" and "SIG-".

    • Connect the cable shield (braid) to the IPC's "SHLD" or "GND" terminal.

    • Ensure connections are secure to avoid poor contact. Use the waterproof cable gland supplied with the IPC to ensure a seal at the connector.

  2. System Grounding: Follow the single-point grounding principle. Typically, the signal shield is grounded well at the charge amplifier (IPC). At the monitoring system end (GSI or acquisition card), the shield should be left floating to prevent ground loops from forming.

3. Influence of Different Mounting Methods on Frequency Response (Per ISO 5348 Standard)

  • Rigid Screw Mounting (Preferred): Provides the widest, flattest frequency response, potentially up to the sensor's own resonant frequency (>22kHz), with minimal phase distortion.

  • Adhesive Mounting (Cyanoacrylate): Good frequency response, suitable for surfaces that cannot be drilled, but long-term temperature resistance is limited (typically <150°C).

  • Double-sided Tape / Magnetic Base: Suitable only for temporary diagnostic measurements. Frequency response is severely attenuated, with an upper limit potentially reduced to 2-5 kHz, and repeatability is poor.

  • Hand-held Probe: For extremely rough surveys only; results are unreliable and not suitable for any quantitative monitoring.


5. Maintenance, Troubleshooting, and Important Notes

  1. Routine Inspection:

    • Visually inspect the sensor for significant impact damage or corrosion.

    • Check the cable sleeve for cuts, abrasions, or signs of heat damage.

    • Check that mounting screws are tight and connectors are properly sealed.

  2. Troubleshooting:

    • No Signal / Weak Signal: Check for cable breaks; verify connections to the IPC are correct and secure; check IPC power supply.

    • Noisy Signal: Verify shield grounding is proper (single-point); check if cable is running parallel to strong interference sources; check mounting surface cleanliness and flatness; check if cable is loose and causing friction.

    • Signal Drift: Check if the sensor operating temperature exceeds its specified error curve range; check the mounting base for thermal expansion or stress changes.

  3. Prohibited Actions:

    • NEVER strike, disassemble, or attempt to repair the sensor.

    • NEVER subject the cable to excessive tension, torsion, or sharp bending.

    • NEVER use the sensor in environments exceeding the specified temperature ranges, especially the cable portion.

    • NEVER install the sensor without reading the complete installation manual and safety guidelines.

  4. Calibration & Service Life: The CA202 is precision-calibrated at the factory and exhibits extremely high long-term stability under normal operating conditions, typically requiring no periodic field calibration. If systematic deviations occur in system measurements, it is recommended to first check the subsequent conditioning and acquisition stages. The sensor itself is designed for a service life spanning decades.


Category Parameter Specification & Value Test Conditions & Remarks
Basic Information Product Model CA202 (Standard Version, Non-Explosion Proof) Meggitt vibro-meter Product Line

Ordering Number (PNR) 144-202-000-225 Standard Version, 11m Integral Cable

Sensing Principle Piezoelectric Effect, Shear Mode Symmetrical Polycrystalline Measuring Element

Output Type Charge Output Differential, 2-pole system, insulated from case

Signal Conditioning Requirement Requires external charge amplifier/transmitter Recommended to use IPC 70x series signal conditioners
Electrical & Performance Parameters Sensitivity 100 pC/g ± 5% At 23°C ±5°C, 120 Hz, 5 g peak conditions

Dynamic Measurement Range 0.01 g to 400 g (peak) Random vibration

Overload Capacity (Spike) Up to 500 g (peak) Transient spike signals

Linearity ±1% (0.01 to 20 g peak)
±2% (20 to 400 g peak)
Percentage of Full Scale

Transverse Sensitivity ≤ 3%

Resonant Frequency (Mounted) > 22 kHz (nominal) Actual value is typically higher, depends on mounting stiffness

Frequency Response (±5%) 0.5 Hz to 6000 Hz Lower cutoff frequency depends on the high-pass filter setting of the charge amplifier used

Typical Deviation @ 8kHz +10% Deviation relative to flat frequency response

Internal Insulation Resistance ≥ 1 x 10⁹ Ω (minimum) Inside sensor

Capacitance (Nominal) Sensor:
- Pole to Pole: 5000 pF
- Pole to Case: 10 pF
Cable (per meter):
- Pole to Pole: 105 pF/m
- Pole to Case: 210 pF/m
Cable capacitance adds to system total, must be considered during system calibration
Environmental & Durability Parameters Operating Temperature Range Sensor Body: -55°C to +260°C
Integral Cable: -55°C to +200°C
Continuous operating temperature

Short-Term Survival Temperature Sensor Body: -70°C to +280°C
Integral Cable: -62°C to +250°C
Tolerance limit in non-operating state

Temperature Sensitivity Error -55°C to +23°C: 0.25% / °C
+23°C to +260°C: 0.1% / °C
Rate of sensitivity change relative to 23°C (73°F) reference

Protection & Materials Housing: Austenitic Stainless Steel (1.4441), hermetically welded.
Protection Hose: Heat-Resistant Stainless Steel (1.4541), hermetically welded.
Sealing: Resistant to 100% RH, water, steam, oil, salt spray, dust, fungus, etc.
Forms a leak-tight sealed assembly

Base Strain Sensitivity 0.15 x 10⁻³ g / με Equivalent acceleration error generated under 250 με peak-to-peak base strain

Shock Resistance ≤ 1000 g (peak) Half sine wave, 1 ms duration

Explosion Proof Certification This Model (-225): Not Applicable.
Optional Models: Available in Ex ia IIC T6...T2 Ga (Intrinsic Safety) and Ex na IIC T6...T2 Gc (Non-Sparking) certified versions.
Hazardous area applications must use corresponding Ex-proof models
Mechanical & Physical Parameters Housing Material Austenitic Stainless Steel

Weight Sensor (with base): Approx. 250 g
Cable (per unit length): Approx. 135 g/m


Cable Length 11 meters Integral low-noise cable with stainless steel sleeve

Cable Type 2-pole twisted and shielded cable Outer layer is stainless steel flexible protection hose (BOA)

Mounting 4 x M6 x 35 socket head cap screws, with 4 x M6 spring lock washers.
Mounting Torque: 15 N·m.
Note: Electrical insulation of mounting surface is not required.


Electrical Connection Flying leads (stripped wire ends) at cable end For direct connection to terminal blocks or signal conditioners
Calibration & Warranty Factory Calibration Dynamic calibration performed at 5 g peak, 120 Hz, 23°C. Calibration data provided. No periodic field calibration required under normal operating conditions.

Compliance & Approvals EMC: Complies with EN 61000-6-2, EN 61000-6-4
Safety: Complies with EN 61010-1
Environmental: RoHS (2011/65/EU) compliant
Regional: CE Marking, EAC Marking (Eurasian Union)


CA202 (4)

Previous: 
Next: 

Quick Links

PRODUCTS

OEM

Contact Us

 Telephone: +86-181-0690-6650
 WhatsApp: +8618106906650
 Email:  sales2@exstar-automation.com / lily@htechplc.com
 Address: Room 1904, Building B, Diamond Coast, No. 96 Lujiang Road, Siming District, Xiamen Fujian, China
Copyright © 2025 Exstar Automation Services Co., Ltd. All Rights Reserved.